In March I wrote about managing twelve machines with NixOS. When I read it again, I noticed that it starts somewhere in the middle: it assumes you already run NixOS, already have a flake, and already know what a module is. If you don’t, reading it is a bit like asking for directions and getting a photo of the destination.
And getting started really is the hard part. A graphical installer asks you a few questions and then hands you a desktop. The NixOS minimal ISO doesn’t ask you anything. You get a blinking cursor, a disk and a manual, and the rest is up to you. The manual is good and walks you through partitioning, but then it gives you a configuration.nix and nixos-install, and flakes, which is how I build everything these days, get a single sentence near the end.
So I want to walk you through one complete first installation, from that blinking cursor to a KDE desktop with a terminal, NetworkManager and git, built from a flake right from the first boot. You should be comfortable in a Linux shell; the NixOS part is what I’ll explain along the way. I did every step in a virtual machine, in the order you’ll read them, and the screenshots are from that run. One step tripped me up, and I left that in, right next to the way around it.
Tested on 10 November 2026 with nixos-minimal-26.05.13936.ac588ef1c914-x86_64-linux.iso, the Nix 2.34.9 that ships on it, and nixpkgs locked to the same 26.05 release.

Where We’re Headed
This is where you’ll end up:
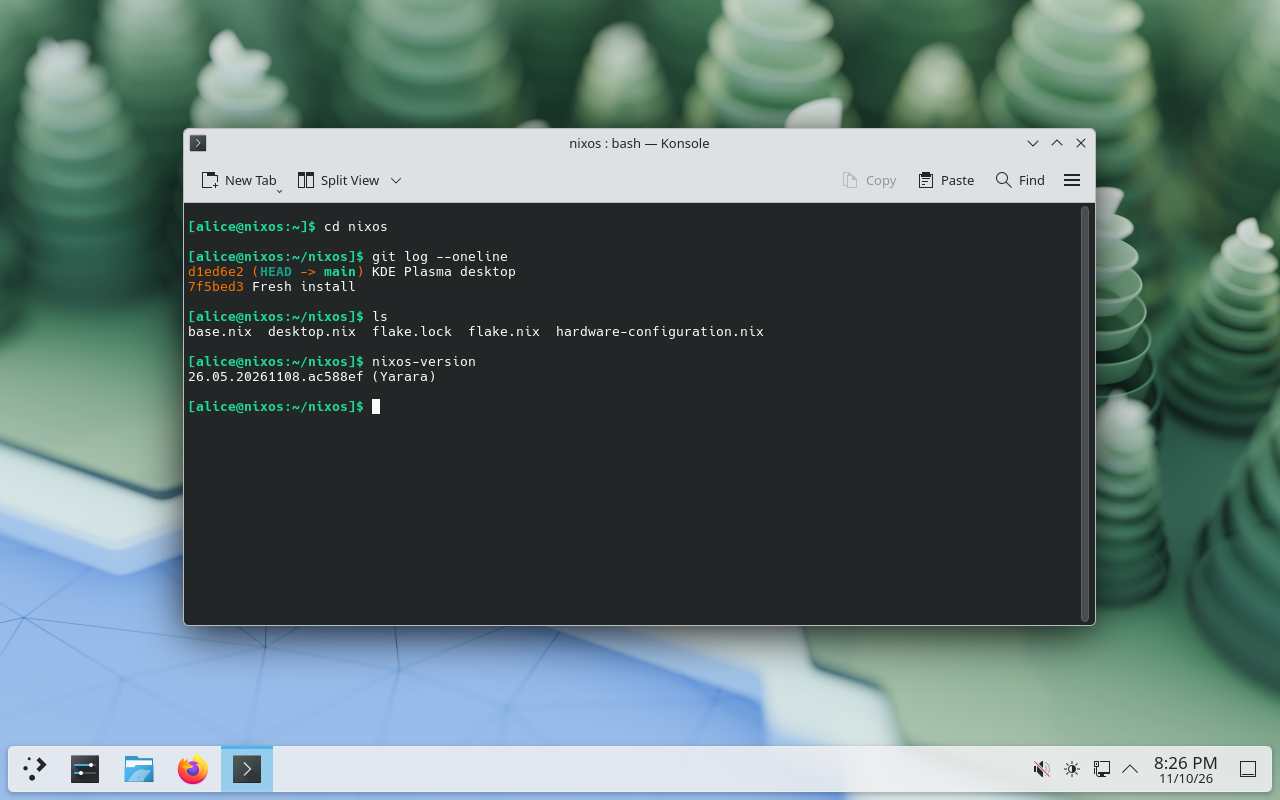
KDE Plasma, Konsole open, the network icon down in the corner. It’s not a fancy desktop, and I didn’t want it to be. What I care about is what’s behind it: everything you set up through NixOS, the packages, the services, the system settings, lives as a handful of text files in a git repository in your home folder. You can read them, diff them and commit them, and when you change one and rebuild, the machine changes with it.
I left a few things out on purpose: disk encryption, disko, Home Manager, and running more than one machine. They’re all worth having, but each of them is much easier to pick up once you have a working system to come back to. For a first day, one new thing at a time is plenty.
“Can’t I just use the graphical installer?”
Sure, and there’s nothing wrong with that. The graphical ISO runs Calamares, you click through a few pages and you have a desktop, with a classic configuration.nix and no flake. That’s a perfectly good way to start. I went with the minimal ISO for two reasons. I wanted the flake to be there from the very first boot, and when you write the configuration yourself, you know what each file is for. That pays off later, the first time something breaks and you actually recognise what you’re looking at.
Try it in a VM first
If you can, try the whole thing in a virtual machine first. When something goes wrong there, you throw the VM away and start over, and by the time you do it on real hardware, nothing surprises you anymore. Any VM software will do as long as the guest gets UEFI firmware and an x86_64 CPU. I gave mine 6 GB of RAM and a 40 GB disk.
My setup was an x86_64 Linux host with KVM, running QEMU and its UEFI firmware from nixpkgs. Grab the Minimal ISO image from nixos.org/download before you start.
On your computer, once, to create the VM’s files:
nix --extra-experimental-features "nix-command flakes" shell nixpkgs#qemu
Q=$(dirname $(dirname $(readlink -f $(which qemu-system-x86_64))))/share/qemu
cp $Q/edk2-i386-vars.fd vars.fd && chmod u+w vars.fd
qemu-img create -f qcow2 disk.qcow2 40G
disk.qcow2 is the virtual disk. vars.fd is where the firmware keeps its settings, and since NixOS registers its boot loader in there during the install, it needs to be your own writable copy. Your distribution’s QEMU works too, but expect its UEFI firmware files to sit somewhere else under different names.
Then start the installer:
qemu-system-x86_64 -machine q35,accel=kvm -cpu host -smp 4 -m 6G \
  -drive if=pflash,format=raw,readonly=on,file=$Q/edk2-x86_64-code.fd \
  -drive if=pflash,format=raw,file=vars.fd \
  -drive file=disk.qcow2,if=none,id=disk -device ide-hd,drive=disk \
  -cdrom nixos-minimal-26.05.13936.ac588ef1c914-x86_64-linux.iso \
  -nic user,model=virtio-net-pci -device virtio-vga
Put the file name of the ISO you downloaded into the -cdrom line. Inside the VM the disk shows up as /dev/sda, just like in the manual and in all the commands below. If you come back later in a new terminal, you only need the nix shell and Q= lines again. Don’t rerun the other two, or you’ll overwrite your firmware settings and your disk.
Boot the Installer and Get a Root Shell
The ISO boots into a menu, and the first entry is the one you want.
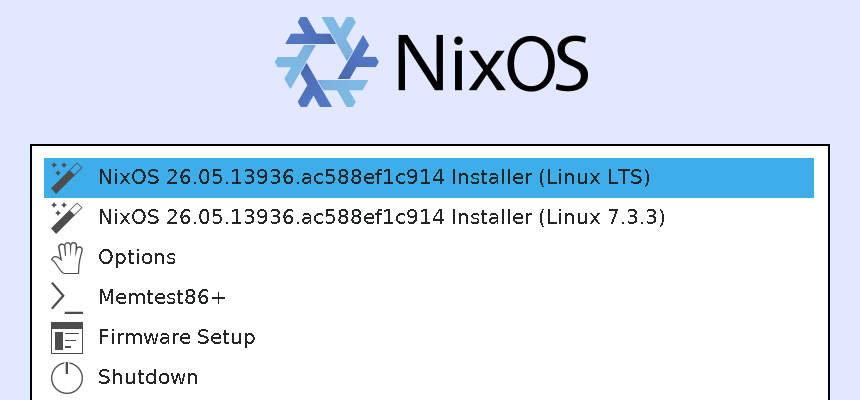
A few seconds later you’re on a plain text console, already logged in as a user called nixos, without being asked for a password. Nearly everything from here on needs root, so switch to root and take a look around.
In the installer, from here on as root:
sudo -i
ip -br a
lsblk
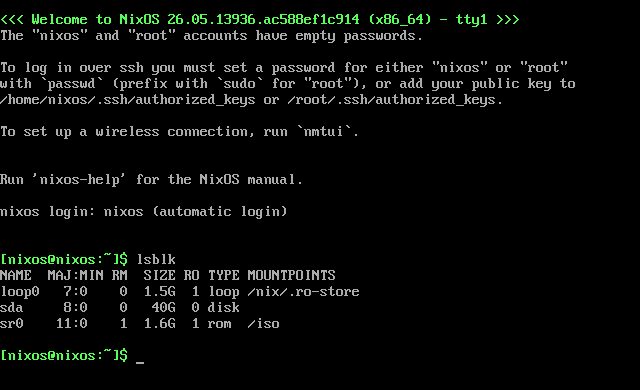
If there’s a network cable plugged in, you’re already online. On WiFi, nmtui gives you a small menu where you pick your network. And on a real computer your disk may well be /dev/nvme0n1 rather than /dev/sda, with partitions called nvme0n1p1, nvme0n1p2 and so on, so check lsblk before you type anything that formats.
Partition, Format, Mount: Straight from the Manual
I didn’t want to get creative with the disk, so this is the manual’s example exactly as it stands there. That way, if something looks off, you can put the two side by side. And just so it’s said: this wipes the entire disk.
parted /dev/sda -- mklabel gpt
parted /dev/sda -- mkpart root ext4 512MB -8GB
parted /dev/sda -- mkpart swap linux-swap -8GB 100%
parted /dev/sda -- mkpart ESP fat32 1MB 512MB
parted /dev/sda -- set 3 esp on

mkfs.ext4 -L nixos /dev/sda1
mkswap -L swap /dev/sda2
mkfs.fat -F 32 -n boot /dev/sda3

mount /dev/disk/by-label/nixos /mnt
mkdir -p /mnt/boot
mount -o umask=077 /dev/disk/by-label/boot /mnt/boot
swapon /dev/sda2
That leaves you with a large partition for the system, 8 GB of swap at the end and a small boot partition at the front. parted prints “You may need to update /etc/fstab” after every single command, five times in total, and you can ignore it every time, because NixOS writes that file for you. The umask=077 makes the boot partition readable for root only: the boot loader keeps a random seed there and complains if anyone else can read it.
Let NixOS Look at the Hardware
nixos-generate-config --root /mnt
This looks at the machine and writes two files into /mnt/etc/nixos/. The first one is hardware-configuration.nix.
Example output from my VM. Keep the file generated on your machine, and don’t copy these UUIDs:
{ config, lib, pkgs, modulesPath, ... }:

{
  imports =
    [ (modulesPath + "/profiles/qemu-guest.nix")
    ];

  boot.initrd.availableKernelModules = [ "xhci_pci" "ahci" "sd_mod" "sr_mod" ];
  boot.kernelModules = [ "kvm-intel" ];

  fileSystems."/" =
    { device = "/dev/disk/by-uuid/7c0cec0c-2f31-462f-831f-09fdc2898668";
      fsType = "ext4";
    };

  fileSystems."/boot" =
    { device = "/dev/disk/by-uuid/EF68-9843";
      fsType = "vfat";
      options = [ "fmask=0077" "dmask=0077" ];
    };

  swapDevices =
    [ { device = "/dev/disk/by-uuid/6bdfc13e-aa78-4394-9ef5-8c99c5b55c1c"; }
    ];

  nixpkgs.hostPlatform = lib.mkDefault "x86_64-linux";
}
It figured out that it’s running inside QEMU, found the partitions you just mounted, and worked out which drivers the early boot stage needs to get to the disk. This is also where your fstab ends up. You won’t edit this file by hand, since it describes this particular disk in this particular machine, and that comes up again near the end.
The second file is configuration.nix. It’s about a hundred lines, nearly all of them commented-out examples, and it’s worth reading once because it’s a nice little tour of what NixOS can do. After that, delete it:
rm /mnt/etc/nixos/configuration.nix
In the classic setup without a flake, configuration.nix is the file the system gets built from, and it’s the name the manual and most guides use. Here the flake decides which files make up the system, so nothing would ever read it, and I’d rather not have a file with that name lying around that I might open, edit, and then wonder why nothing changes.
About the --flake switch
nixos-generate-config can also write a flake.nix for you if you pass --flake, and that’s what I tried first. The flake it wrote follows nixos-unstable, the rolling release, and the comment above it suggests nixos-24.11 as the stable alternative, three releases older than the ISO it came from. There’s nothing wrong with unstable, my own machines run it. But you just booted a 26.05 installer, and I don’t think you should end up on a different release without noticing. The flake is only about a dozen lines anyway, so let’s write it ourselves.
The Smallest Flake That Installs
This is the part the manual leaves out. You need two files in /mnt/etc/nixos/, and the ISO has nano and vim to write them with. Start with flake.nix:
{
  description = "My first NixOS machine";

  inputs = {
    nixpkgs.url = "https://channels.nixos.org/nixos-26.05/nixexprs.tar.zst";
  };

  outputs = { nixpkgs, ... }: {
    nixosConfigurations.wonderland = nixpkgs.lib.nixosSystem {
      modules = [
        ./hardware-configuration.nix
        ./base.nix
      ];
    };
  };
}
A flake has inputs and outputs, and this one has one of each. The input is nixpkgs from the 26.05 release channel, which gives you all the packages and, along with them, the whole NixOS module system. The output is a NixOS configuration called wonderland, which nixosSystem builds from the modules in that list: the hardware file the installer generated, and base.nix, which you’ll write next. Every file that belongs to your system has to appear in that list, so whenever you wonder what your system is made of, flake.nix is the place to look.
The name wonderland isn’t arbitrary. It’s the hostname you’re about to set (if the user is called alice, the machine might as well be wonderland), and nixos-rebuild picks the configuration with the same name as the machine it runs on, so you never have to type it.
Next comes base.nix, with the settings that make this machine yours:
{ config, pkgs, ... }:

{
  boot.loader.systemd-boot.enable = true;
  boot.loader.efi.canTouchEfiVariables = true;

  networking.hostName = "wonderland";
  networking.networkmanager.enable = true;

  time.timeZone = "Europe/Berlin";

  users.users.alice = {
    isNormalUser = true;
    extraGroups = [ "wheel" "networkmanager" ];
  };

  nix.settings.experimental-features = [ "nix-command" "flakes" ];

  environment.systemPackages = with pkgs; [
    git
    vim
  ];

  system.stateVersion = "26.05";
}
I borrowed alice from the manual’s examples. Put your own name there instead, and your own time zone in place of Berlin. Here’s what each part does:
- Boot loader: systemd-boot, and the permission to add itself to your firmware’s boot menu.
- Hostname and NetworkManager: the same NetworkManager the installer uses, so the network works the same way once you’re on the installed system.
- Your user:
wheelis what lets you usesudo, andnetworkmanagerlets you change network settings. - Flakes: they’re still officially marked experimental, so you have to tell the installed system that you use them.
nixos-installandnixos-rebuildquietly turn them on for themselves, so if you forget this line, you won’t notice until the day you runnix flake updateand Nix refuses. - Packages:
environment.systemPackagesis simply the list of programs you want installed. Everything else on the system is there because some module needed it. system.stateVersion: it’s tempting to read this as the release you’re on, but it isn’t. It remembers which release this machine was installed with, so that services keeping data on disk, databases for example, stay with the formats they started out with. You set it now and leave it as it is, even when you upgrade later.
Lock First, Then Install
Here the manual would have you run nixos-install, and that’s exactly what I did the first time. It failed (more on that in a moment), so now I run one more command before it, which writes the lock file first:
nix --extra-experimental-features "nix-command flakes" flake lock /mnt/etc/nixos
nixos-install --flake /mnt/etc/nixos#wonderland
The lock file, flake.lock, records exactly which nixpkgs you’re on, nixos-26.05.13936.ac588ef1c914 in my case. The URL in flake.nix moves forward with every new 26.05 build, while the lock file keeps your configuration on the one you have until you decide to update.
With the lock file there, the install was done in under a minute on my connection. It only asks you one thing, right at the end: a root password. You’ll hardly ever need it, but on a bad day it’s how you get in.
Why I create the lock file myself
When I ran nixos-install on its own, on a fresh folder without a lock file, it gave up after about half a minute with this:
warning: creating lock file "/mnt/etc/nixos/flake.lock":
• Added input 'nixpkgs':
    'https://releases.nixos.org/nixos/26.05/nixos-26.05.13936.ac588ef1c914/nixexprs.tar.zst?narHash=...' (2026-11-08)
copying channel...
building the flake in path:/mnt/etc/nixos?lastModified=1794334496&narHash=sha256-%2BZnS3...
error: NAR hash mismatch in input 'path:/mnt/etc/nixos?lastModified=...', expected 'sha256-53a6Pfki...' but got 'sha256-+ZnS3Zmj...'
A hash mismatch, in a folder you made five minutes ago, on the very first NixOS command you run. If you get this, you didn’t do anything wrong. The installer script starts by running nix flake metadata on your folder. That takes a fingerprint of what’s in it and, while it’s at it, writes flake.lock into the same folder. Then the script builds against the fingerprint, finds a file that wasn’t there when the fingerprint was taken, and refuses to go on. It basically trips over its own lock file.
That’s how I read the script, and when I ran the same two steps by hand on the same ISO, I got the same error. I couldn’t find a report about it in the nixpkgs or Nix issue trackers, and other ISO or Nix versions might not do this at all. If it does happen to you, just run the install again, because by then the lock file is there. I’d simply rather create it up front and never see the error.
nixos-enter: One Last Thing Before the Reboot
There’s one thing the flake can’t do for you, and that’s setting a password. The alice account exists on the new system, but it doesn’t have a password yet, so you couldn’t log in. nixos-enter lets you fix that from the installer. It runs a command inside the freshly installed system, a bit like chroot, but it also sets up what NixOS’s own tools expect to find:
nixos-enter --root /mnt -c 'passwd alice'
Keep nixos-enter in mind, by the way. If a system ever refuses to boot, you can start the ISO, mount the disks to /mnt like you did today, and nixos-enter gets you a working shell inside it.
You’ll notice the password doesn’t end up in any of your .nix files. Like your personal files, it lives on the machine and not in the configuration.
In the VM, shut down rather than reboot, so you can start it again without the ISO:
poweroff
Back on your computer, run just the qemu-system-x86_64 command again, without the -cdrom line and with the same disk.qcow2 and vars.fd. On real hardware, reboot and pull out the USB stick.
First Boot: Make the Config Yours
Now the system you wrote down runs for the first time. The boot menu has one entry, NixOS, and after a moment you get a plain text login. Log in with your user name and the password you just set.
On your new system, as yourself, from here on:
In my VM the virtual network cable just worked, and git was there because I’d put it on the list. If you used WiFi in the installer and the new system is offline, run nmtui once more, because the installed system doesn’t know your WiFi password yet.
Your configuration is still in /etc/nixos, owned by root. I keep mine in a git repository in my home folder, and I’d move it there right away:
cp -r /etc/nixos ~/nixos
cd ~/nixos
git config --global user.name "Alice"
git config --global user.email "alice@example.org"
git init
git add .
git commit -m "Fresh install"
That way you can edit your configuration without sudo, every change has a history, and when something stops working, git log shows you what you changed right before. There’s another reason too, and you’ll run into it in a minute.
From here on, ~/nixos is your configuration. You can delete the old /etc/nixos once you’re comfortable with the new place.
Adding KDE: Two Lines and a Rebuild
I like to give the desktop a file of its own. You can see at a glance what KDE brought in, and if you ever want it gone, it’s one line in flake.nix. Create ~/nixos/desktop.nix:
{ pkgs, ... }:

{
  services.displayManager.sddm.enable = true;
  services.desktopManager.plasma6.enable = true;

  programs.firefox.enable = true;
}
and add it to the module list in flake.nix:
      modules = [
        ./hardware-configuration.nix
        ./base.nix
        ./desktop.nix
      ];
I didn’t want to trust my memory on what those two options switch on, so I looked at the evaluated configuration. The SDDM login screen runs on Wayland. PipeWire handles audio, and in 26.05 its PulseAudio compatibility (services.pipewire.pulse.enable, which is a separate setting) is turned on as well. Konsole comes with the Plasma packages, and because NetworkManager is enabled, the module puts the network applet in the panel. Firefox is my own addition.
Let git know about the new file, then build:
git add desktop.nix
nixos-rebuild boot --flake ~/nixos --sudo
--flake ~/nixos builds from your folder and picks the configuration named after the machine. --sudo lets you build as your normal user and only asks for your password when the result gets activated. And boot makes the new system the default from the next boot on, while leaving the one you’re running alone. For something as big as a whole desktop, that’s what I want. For everyday changes later on, switch activates the new configuration straight away.
Why the git add comes first
This is the other reason for the git repository. When your flake lives in a git repository, Nix only sees the files git knows about. If you skip the git add, the rebuild stops with this:
error: Path 'desktop.nix' in the repository "/home/alice/nixos" is not tracked by Git.
       To make it visible to Nix, run:

       git -C "/home/alice/nixos" add "desktop.nix"
You need an add here, not a commit. Once git knows about a file, Nix picks up your uncommitted edits to it as well. These days the error even tells you what to type. Older Nix versions just claimed the file didn’t exist, which is pretty confusing when you’re looking right at it in your editor.
The second boot
Be patient with this one. It’s the big download of the day, KDE and Firefox and everything they pull in, and in my VM it took far longer than anything else in this post. When it’s done:
reboot

The boot menu now has two entries. Generation 2 on top is your configuration with KDE, and it’s the default. Generation 1 below it is the console-only system you installed earlier, still there and exactly as it was. If the desktop doesn’t come up, pick Generation 1 and you’re back on the system you had before.
This time you’re greeted by the SDDM login screen instead of a text prompt. Log in, open Konsole, and you’re looking at the screenshot from the top of this post. I’d commit right now, while you know it works:
cd ~/nixos
git commit -am "KDE Plasma desktop"
The Loop from Here On
Your ~/nixos folder now has five files in it:
| File | What it does |
|---|---|
flake.nix | Picks the nixpkgs release, names your system wonderland and lists its modules |
flake.lock | Pins the exact nixpkgs build you’re using |
base.nix | Your main settings: boot loader, network, user, packages |
hardware-configuration.nix | What the installer found on this machine and disk |
desktop.nix | KDE and Firefox |
It helps to know what’s not in there, too. The passwords you set with passwd, the name you gave git config, and everything in your home folder live on the machine, the way they would on any other Linux. The folder describes the system, but your data isn’t in it.
From now on, changing your system always goes the same way:
- Change something in
~/nixos. git addwhat you changed, new files and edited ones.nixos-rebuild switch --flake ~/nixos --sudo- Check that it does what you wanted, then
git commit.
If you want a program, add it to environment.systemPackages. If you’re looking for a setting, bookmark search.nixos.org/options and search for things like “bluetooth” or “printing”. Every option from this post is in there, too.
Updating is two commands inside ~/nixos: nix flake update moves your lock file to the newest 26.05 build, and a rebuild applies it. Then commit the new flake.lock like any other change.
If an update or a change breaks something, nixos-rebuild switch --rollback --sudo takes you back to the previous system, or you pick an older entry in the boot menu. Keep in mind that a rollback only changes which system is running. Your ~/nixos folder and your files stay as they are, so after rolling back, fix or revert the change in the folder as well, or the next rebuild will cheerfully build the same problem again.
When 26.11 comes out, change 26.05 to 26.11 in the URL in flake.nix, run nix flake update and rebuild. system.stateVersion stays at 26.05, even then.
When Something Goes Wrong
Sooner or later you’ll forget a git add. Nix tells you which file it can’t see, you add it, and you carry on.
A typo in a .nix file gives you an error that starts somewhere deep inside nixpkgs, and it’s a long, very serious-looking wall of text. Scroll to the bottom. The last few lines usually point at your file and the line where it went wrong, and quite often it turns out to be a missing semicolon.
Once you want to understand the files you wrote rather than just copy them, a good place to start is the { config, pkgs, ... }: at the top of base.nix. It means the file is a function: it gets its arguments and returns a set of options. The Nix language tutorial on nix.dev explains exactly this, with small examples you can try out in nix repl.
Where to Go Next
You now have a desktop, a terminal, a browser, and a small repository that describes how your system is put together. Here’s what I’d do next:
- Put
~/nixossomewhere other than this machine. GitHub, Codeberg or your own server all work. A reinstall then means partitioning and mounting the new disk, cloning the repository to/mnt/etc/nixos, generating a fresh hardware file for the new disk withnixos-generate-config --root /mnt --show-hardware-config > /mnt/etc/nixos/hardware-configuration.nix, and installing from the flake. Your passwords and personal files still need their own setup and backups. - Home Manager does for your personal settings what this flake does for the system: your shell, your editor and your git config, all in files.
- A second machine. Add another entry next to
nixosConfigurations.wonderland, share what the two have in common, and you’re well on the way the twelve-machine post describes.
I came to NixOS from Gentoo and Debian. On Gentoo, the system on my disk was the result of months of commands I’d typed, and whatever notes I kept about them stopped matching reality pretty quickly. What you have now is different: a desktop with a record. There are the configuration files, the locked inputs, and two commits that show how you got here. Push that repository somewhere safe, then add a program you actually use, rebuild, and commit it.